How to add media
When adding media into TNG, there are three basic methods available:
- If you want to add only one media item at a time, along with using the facility to edit the media information at the same time, read the rest of the section on Adding a Media File, immediately below.
- If you already have uploaded a number of media files in your TNG media folder(s), and you just want to do a bulk import onto your website and link them later, read the section on ”How to import media in bulk”.
- If you have a number of media files on your home computer and want to bulk import them into TNG, whilst at the same time giving them titles and descriptions, and connecting them with individuals, families, sources or places. Read the section on ”How to upload media”.
Adding a Media File
For example: if you only want to copy a photograph or other media item from your home computer, and to link it with a person; you will need administrator, editor or media editor privileges for this task.
Go to the Media page. The ‘Search’ tab will show you the current list of media in a table layout. But we want to add another image, so click on the ‘Add New’ tab.
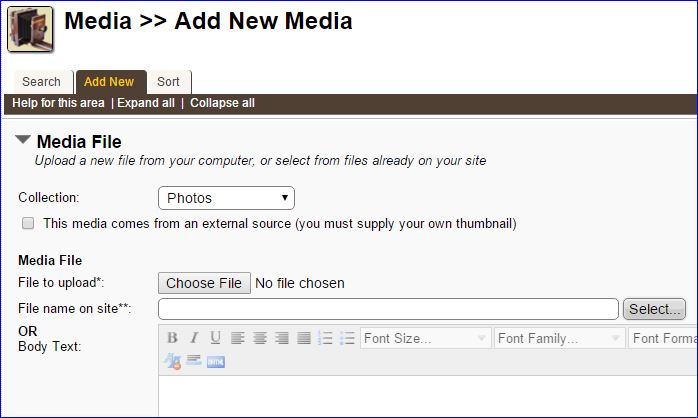
The ‘Add New Media’ page has a lot of options, so let’s go through the steps. This will be a photo of my dad, so set the Collection choice to ‘Photos’. The steps will be very similar for the other collections. Ignore the next checkbox: “This media comes from an external source”, as this only applies if the image comes from another website. We are getting our image from our home computer.
The next area tells TNG where to find the media file. There are three choices:
- ”’File to upload”’ comes from your home computer. This is what we are going to select.
- ”’File name on site”’ comes from your own media collection folder on the TNG website.
- ”’Body Text”’ will accept a text file from you. You can manually type it into this box, or you can copy-and-paste from another text or word file from elsewhere (e.g., a file on your computer or text from a website). Note that you have some text formatting buttons along the top of this box.
So click on “Choose File” to get an image from your home computer.
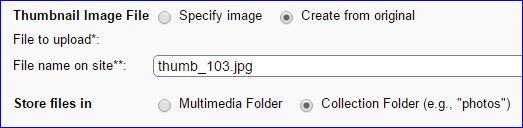
Next, we need a thumbnail image to be created from the original. TNG can create one for you if the original is a valid JPG, GIF or PNG image. My original image file name is 103.jpg, so TNG automatically names the thumbnail for me: thumb_103.jpg. This is because TNG will not allow you to keep the thumbnail and original image file names the same. By default, let TNG store the media files in the same collection folder as selected earlier.
Note: If you are uploading a PDF file, or any other media except images, DO NOT select “Create from Original”. This is because pdf documents are not images, and thumbnails can only be created for images. Select “Specify image” instead, and TNG will provide options for selecting an icon to use for all pdf documents, for example, which can either be uploaded at this time or selected from those already uploaded to TNG.
Media Information

In the next section on this page, Media Information, completing the boxes is optional, but doing so adds value to your visitors and can be informative on the context and relevance to the research.
The ”’Title”’ is a short name for your media. By default, it is the image filename. Usually, that is not very informative, e.g., “DCS123456.jpg”, so you would replace that with a key phrase. The ”’Description”’ is where you can have a more complete sentence or paragraph. You might considering adding here the image caption, if the image came from an Internet news source. You can also include external hyperlinks in the description text.
Both title and description will show up on image display and search results pages for your media.
Selecting a cemetery is to be used only for headstone images. Note that selecting “Always viewable” overrides the “living” status and user permissions.
Selecting “Open in new window” will cause the media to be opened up in a new browser window when its link is clicked.
Now, “Save and continue…” and go onto the next page, where we can link this photo back to the ancestor, where it was taken and who might be in the photo.
Media Links

Now we can link the photo to a person or persons. As this is a photo of my dad, the Tree = “Benedict” and the Type = “Person” are selected. But which person? Each individual in your family tree has a unique person ID. If you know it, type it in this box. If not, use the search icon to do a look up for that person. My dad is ID= I3. Note: all ID’s start with the letter “I”. If you type in the ID number, click on the “Add” button.
If you have more than one person in the photo and want to link them as well, you can do that. Just enter a new ID number in the ID box or do another search and then click “Add” again. You should see a growing list of people that you just linked.
The “Default Photo” selection should be checked if you want the thumbnail image to be show at the top of the individual’s or family’s data page. The “Show” selection makes the thumbnail image show on the individual’s or family’s data page lower down in a section where media are organized.
Place Taken/Created
In the next section, “Place Taken/Created,” if you want a map location to be associated with this photo, you do it here. We will provide a separate tutorial on mapping individuals and places.
Image Map

I like this feature and should use it more often. If you have a photo with multiple family members (see ”Media Links”, above), you can tag each of them in the photo and link back to their individual page. As well, when someone visits the photo on your site, they will see the names appear as the cursor is moved across each person.
So let’s get started.

You should see a full sized image of the photo here. First, select the tree. Then imagine a rectangle that would border the face or body of the person in the picture. With your cursor, click on the upper-left corner of that rectangle, then the lower-right corner. You should see a dotted outline.
In the pop-up window, identify that person (again, for dad, the ID= I3). Or, if you don’t know the ID, put in the First Name and/or the Last Name and let TNG list the choices. Click on one of them to select the person. Then scroll down to the bottom of the page and save your media.
That’s it. If in doubt, don’t forget the “Help for this area” link at the top of each page.